How Should a Woman Prepare for a National Park Visit Alone?
Quick Answer
A woman preparing for a national park visit alone should research current park conditions, choose a route that matches her experience, share a detailed trip plan, carry emergency essentials, and set firm turnaround rules. I also recommend checking the official National Park Service trip-planning guidance shortly before leaving because weather, fires, road access, wildlife activity, and closures can change.
My solo national park preparation steps
- Research the park: Check official alerts, weather, trail conditions, permits, transportation, and seasonal hazards.
- Choose conservatively: Pick a trail comfortably within your fitness, navigation skills, and experience level.
- Share your plan: Tell a trusted person your route, vehicle details, start time, expected return, and overdue-action time.
- Pack for delays: Carry navigation, water, food, layers, sun protection, illumination, first aid, and emergency supplies.
- Prepare offline: Download maps before entering areas where mobile service may disappear.
- Trust your judgment: Turn around when conditions, people, wildlife, fatigue, or your intuition make continuing feel wrong.
One rule I never compromise on
- Getting to a viewpoint is optional. Getting back safely is the real goal.
If you’re wondering how should a woman prepare for a national park visit alone, the answer starts before you reach the entrance station. Solo female travel safety in a national park depends far more on planning, judgment, weather awareness, and self-sufficiency than on trying to eliminate every possible risk.
I approach a solo national park day differently from a city sightseeing day. I assume my phone may lose service, weather may change, parking may be full, and the trail may take longer than expected.
That mindset doesn’t make the trip frightening. It makes the freedom of exploring alone much easier to enjoy.
In This Guide
- Is it safe for a woman to visit a national park alone?
- How should you research the park before going alone?
- What should a woman pack for a solo national park trip?
- How do you make a solo hiking safety plan?
- How should you handle wildlife, weather, and other hazards?
- What should you do on the day of your solo visit?
- Frequently asked questions
- Final takeaway
Is It Safe for a Woman to Visit a National Park Alone?
Yes, many women can enjoy national parks alone with thoughtful preparation. The important question isn’t whether solo park travel is automatically safe or unsafe, but whether you’re prepared for the specific park, route, season, and activity.
Solo national park travel means visiting, hiking, sightseeing, camping, or otherwise exploring a park without a companion. The practical difference is that you’re responsible for your own navigation, decisions, equipment, transportation, and emergency response.
Solo does not have to mean remote
Your first solo park visit doesn’t need to involve a wilderness trail. A popular scenic area with a staffed visitor center and established trails can still feel adventurous.
I like to think of solo park trips as a progression rather than a test of bravery. There is no prize for choosing the most isolated route.
- Beginner-friendly: Visitor-center areas, scenic drives, paved paths, popular short hikes, and ranger programs.
- Intermediate: Longer day hikes on well-marked trails with predictable access and regular foot traffic.
- Advanced: Remote day hikes, off-season conditions, wilderness camping, route-finding, and areas without reliable communications.
Know which risks deserve most of your attention
It is easy to focus entirely on strangers when thinking about solo female travel safety. In many park situations, environmental and logistical problems deserve just as much attention.
- Getting lost or missing a trail junction
- Heat, cold, storms, lightning, snow, or flash flooding
- Running short of water
- Falls, ankle injuries, and exhaustion
- Unexpected road or trail closures
- Wildlife encounters
- Losing mobile service or battery power
- Returning to a trailhead after dark
- Vehicle problems in isolated areas
The National Park Service specifically advises hikers not to depend on a mobile phone as their only safety system. Service may be limited or nonexistent in backcountry areas.
That is one reason I plan as though my phone will become a camera and offline map rather than a guaranteed rescue tool.
Section Takeaway: A solo national park visit can be a realistic choice, but choose the difficulty level based on your current skills rather than your ambition.
How Should You Research the Park Before Going Alone?
Start with the individual park’s official National Park Service page. Check access, alerts, weather concerns, trail information, permits, transportation, and operating hours before making detailed plans.
Do this again shortly before departure. A plan made three months earlier may not reflect today’s road, fire, snow, water, or trail conditions.
Check whether reservations or permits are required
Reservation systems are not identical across national parks. A park may require reservations for certain entrances, campgrounds, wilderness trips, popular hikes, tours, or specific corridors.
Requirements can also change from one year to another. In 2026, for example, some major parks use timed-entry systems while others that previously used them do not.
Use the official NPS Plan Your Visit resources and the specific park website rather than relying on an old social-media post.
Read active alerts before choosing your route
The National Park Service maintains active park alerts covering dangers, closures, cautions, and other information. The individual park page usually provides more detail.
Look for issues such as:
- Wildfire or smoke
- Flooding or high water
- Snow and ice
- Extreme heat
- Road closures
- Trail or bridge damage
- Wildlife activity
- Water availability
- Seasonal shuttle changes
Study the whole route, not just the viewpoint
A beautiful summit photograph tells you almost nothing about the trail required to reach it. Study distance, elevation change, exposure, trail surface, junctions, water availability, and the return route.
Also identify the trailhead before driving into the park. Downloading that information at your hotel is easier than searching for it beside a road with one bar of service.
Match the trip style to your solo experience
| Trip style | Planning level | Main preparation | Best fit |
|---|---|---|---|
| Scenic drive + short walks | Lower | Road status, parking, fuel, weather, water | First solo park visit |
| Established day hike | Moderate | Route, turnaround time, Ten Essentials, trip plan | Prepared beginner or occasional hiker |
| Frontcountry camping | Moderate | Campground reservation, food storage, nighttime temperatures | Traveler comfortable sleeping outdoors |
| Backcountry overnight | High | Permit rules, navigation, emergency communication, water treatment, food storage | Experienced wilderness traveler |
I would rather finish a straightforward trail feeling strong than spend the final two hours of an ambitious hike exhausted. Solo travel gives you complete control over that choice.
Section Takeaway: Research the exact park and activity, then check the information again near departure. Reservations, closures, hazards, and trail conditions can change.
What Should a Woman Pack for a Solo National Park Trip?
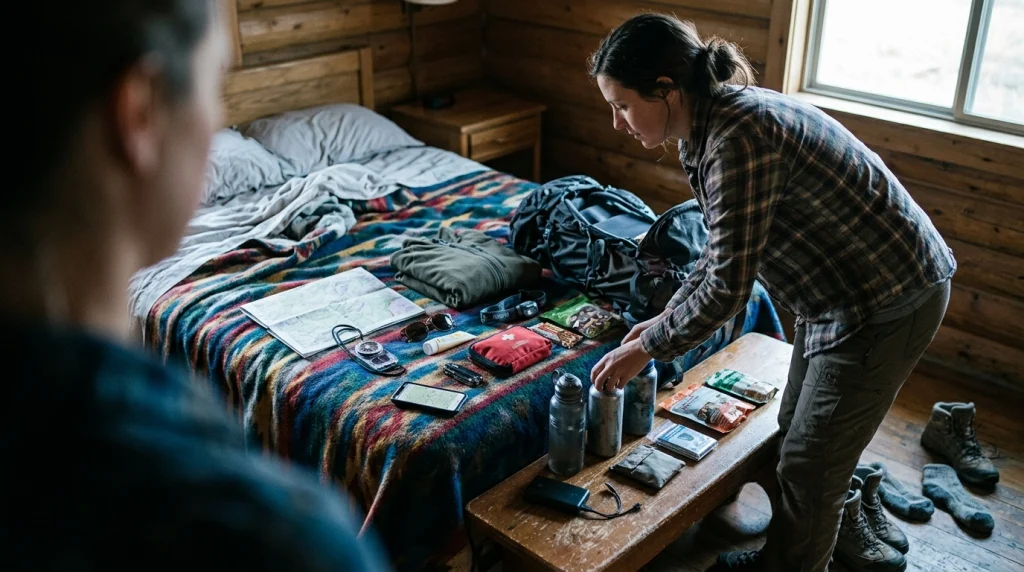
Pack enough to handle a routine outing and a reasonable delay. Your exact gear depends on weather, elevation, remoteness, trip length, and the park’s hazards.
The National Park Service recommends carrying the Ten Essentials. I treat those categories as the foundation, then add park-specific equipment.
The Ten Essentials framework
- Navigation: Map, compass, GPS, or another appropriate navigation system.
- Sun protection: Sunglasses, sunscreen, protective clothing, and a hat.
- Insulation: Extra layers suitable for the conditions you could encounter.
- Illumination: A headlamp or flashlight plus suitable backup power.
- First aid: Supplies appropriate for your trip and personal needs.
- Fire: Emergency fire-starting supplies where appropriate and legally permitted.
- Repair tools: Basic tools or repair materials suited to your equipment.
- Nutrition: Food beyond the minimum you expect to eat.
- Hydration: Water and, when relevant, a way to treat additional water.
- Emergency shelter: Protection such as a lightweight emergency blanket, bivy, or tarp.
Add items that solve your personal problems
The best packing list is not identical for every woman. Think about what would turn a minor inconvenience into a serious problem for you.
- Prescription medication
- Menstrual products
- Blister treatment
- Insect repellent
- Electrolytes when appropriate
- Extra contact lenses or glasses
- A whistle
- Portable battery pack
- Offline map already downloaded
- Paper copy or screenshot of critical information
- Emergency contact details
Dress for the environment, not the photograph
Good footwear and functional layers matter more than creating a perfect travel outfit. Trail conditions can include loose rock, mud, water crossings, snow, cactus, insects, or intense sun.
I also avoid carrying brand-new footwear on a significant hike. A beautiful boot that creates blisters after four miles isn’t useful safety equipment.
Keep emergency gear accessible
Don’t bury your headlamp, rain shell, whistle, first aid kit, or map under everything else. The items you may need suddenly should be reachable quickly.
A small amount of organization makes a big difference when the weather shifts or daylight begins disappearing.
Section Takeaway: Build your pack around the Ten Essentials, then customize it for the specific park, weather, route, and your own needs.
How Do You Make a Solo Hiking Safety Plan?
A solo safety plan tells another person where you’re going and tells you what you’ll do when the day stops going according to plan. It should be specific enough to help if you become overdue.
Leave a detailed trip plan
Send your information to someone who will notice if you don’t return. Simply saying “I’m going hiking in Yosemite” is not detailed enough.
- Park and trail name
- Trailhead or starting location
- Planned route and destination
- Vehicle make, model, color, and license plate
- Start time
- Expected finish time
- Where you’ll stay afterward
- What equipment you’re carrying
- When the person should contact you
- What they should do if you’re overdue
The National Park Service recommends leaving a trip plan with someone who isn’t going on the hike. Search-and-rescue teams can use detailed route information if an emergency occurs.
Create an overdue time, not just a return estimate
I like separating “I expect to finish” from “take action if you haven’t heard from me.” That allows for a normal delay without leaving the emergency contact unsure about what to do.
For example, you might expect to finish at 3:30 p.m. and set a later check-in deadline based on your route, driving distance, and park conditions.
The correct timing depends on the trip. Don’t copy someone else’s numbers without considering your situation.
Set a turnaround time before you start
A turnaround time prevents summit fever, where reaching the destination starts feeling more important than returning safely. Decide your limit while you’re still rested and thinking clearly.
If you reach that time without reaching the viewpoint, turn around. The mountain will still be there.
Prepare for zero signal
Download maps, reservation details, directions, and important phone numbers before entering the park. A screenshot is often more useful than a webpage that refuses to load.
For more remote travel, research whether a satellite communication device or personal locator beacon makes sense for your activity. Carrying one doesn’t replace navigation skills or responsible planning.
Protect your personal information
Being friendly on the trail doesn’t require giving strangers your full itinerary. I don’t feel obligated to announce that I’m alone, where I’m sleeping, or exactly where I’m headed next.
If someone’s behavior concerns you, move toward populated areas or ranger facilities when possible. Changing your plan is always allowed.
Section Takeaway: A useful solo safety plan combines a detailed itinerary, an emergency contact, a clear overdue procedure, offline information, and a predetermined turnaround point.
How Should You Handle Wildlife, Weather, and Other Hazards?
Learn the hazards of the particular park rather than applying one generic rule everywhere. Desert heat, mountain lightning, coastal tides, snowfields, flash floods, and bear country require different preparation.
Check weather from a reliable source
Look at the forecast before leaving lodging and reassess conditions when you reach the park. Rangers can also provide information about current hazards.
Don’t treat an itinerary as a promise. Severe weather is a valid reason to replace a long hike with a visitor center, scenic drive, museum, or shorter trail.
Pro tip: Check the park’s official National Park Service page and current weather information before any hike where heat, lightning, flooding, snow, or cold could affect your route.
Take wildlife rules literally
Animals that look calm are still wild. Never approach wildlife to improve a photograph, and never assume another visitor standing close means the distance is safe.
The National Park Service notes that wildlife-distance rules can vary by park. Review the park’s requirements and its official wildlife-viewing safety guidance.
Food-storage rules also matter. Bears and other animals can learn to associate people, cars, campsites, and backpacks with food.
Know when water is a hazard
Waterfalls, rivers, beaches, canyon streams, and snowmelt can create hazards that aren’t obvious in photographs. Fast water and slippery rock deserve conservative decisions.
In canyon country, distant rain can also affect drainage areas. Never assume clear sky directly overhead means every water-related hazard is absent.
Respect altitude and temperature
A trail can feel much harder at elevation than a similar walk near home. Give yourself time to adjust and pay attention to symptoms rather than forcing your planned pace.
Heat also changes what a “short” hike means. Shade, water availability, exposure, start time, and temperature can matter more than mileage alone.
Stay on the intended route
Social trails and apparent shortcuts can lead toward unstable terrain or fragile environments. Staying on designated routes also makes your trip plan more useful during an emergency.
I resist the temptation to follow people who appear confident but may not know where they’re going. My map and official trail information outrank a stranger’s guess.
Section Takeaway: Weather, terrain, wildlife, water, and altitude vary dramatically between parks. Research the hazards you will actually face and be willing to change plans.
What Should You Do on the Day of Your Solo Visit?

On the morning of your visit, verify conditions one more time and make conservative decisions early. Small problems become harder to solve once you’re miles from the trailhead.
Before leaving your accommodation
- Check the latest forecast.
- Review park alerts and closures.
- Charge your phone and communication equipment.
- Confirm your offline maps work without internet access.
- Fill water containers.
- Pack food and essential medication.
- Send your final trip plan to your emergency contact.
- Confirm fuel or charging needs for your vehicle.
When you reach the park
If a visitor center or ranger station is open, ask about current conditions. Rangers may know about trail damage, wildlife activity, weather changes, or water problems that aren’t obvious from the parking lot.
The NPS specifically recommends asking about closures, forecasts, animal activity, fires, water levels, air quality, and drinking-water availability.
Start earlier than you think you need to
An early start can provide more daylight and more flexibility if you move slower than expected. It may also help with parking at popular trailheads, depending on the park.
Starting early does not mean hiking in darkness without preparation. Choose a start time that fits the route and conditions.
Use check-in points
Pause occasionally and ask yourself simple questions. Do you still have enough water, energy, daylight, and navigational certainty to continue?
Also check whether the weather matches what you expected. Conditions changing faster than your plan is a reason to reassess.
Do not negotiate with your turnaround rule
One of the hardest solo travel skills is quitting a plan when nothing dramatic has happened yet. Fatigue, cloud buildup, an uneasy trail, a navigation doubt, or worsening heat can be enough.
I would rather explain that I turned around than explain why I ignored several early warnings.
Check in when you’re safely finished
Tell your emergency contact once you’re back. Don’t leave someone worrying simply because you forgot the final message.
Then save notes about what worked. Your first solo park visit gives you useful information for the next one.
Section Takeaway: Recheck conditions, talk to rangers when possible, monitor yourself throughout the day, honor your turnaround time, and close the loop with your emergency contact.
Frequently Asked Questions
Is it a bad idea for a woman to hike alone in a national park?
Not automatically. A well-prepared woman on a suitable established trail may have a manageable solo trip, while an unprepared person on a remote route may face greater risk. Match the hike to your fitness, navigation ability, weather, equipment, and wilderness experience.
What is the safest type of national park trip for a first-time solo female traveler?
A good starting point is usually a popular park area with staffed facilities, established trails, predictable access, and activities that can be shortened easily. A scenic drive plus one or two well-marked hikes can build confidence without requiring backcountry skills.
Should I tell people on the trail that I’m traveling alone?
You don’t owe strangers details about your travel status, lodging, or future plans. Friendly conversation is fine, but I keep sensitive itinerary information private and share my detailed route only with the trusted person serving as my emergency contact.
Can I rely on my phone for navigation in a national park?
No. Mobile coverage can be unreliable or absent in parks, and batteries can drain. Download offline maps beforehand and carry an appropriate backup navigation method, especially on longer or remote routes.
Should I carry bear spray when visiting a national park alone?
That depends on the park and local wildlife guidance. Bear spray rules and recommendations are not the same everywhere, so check the specific park’s official wildlife information and learn proper use before carrying any wildlife-deterrent product.
What should I do if I start feeling unsafe during a solo hike?
Take the feeling seriously and reassess immediately. Turning around, moving toward other visitors, returning to a staffed area, changing trails, or abandoning the day’s plan are reasonable choices when conditions or another person’s behavior concern you.
Do I need a satellite communicator for a solo national park visit?
Not for every park visit. It becomes more worth considering as your route gets longer, more remote, and farther from reliable cellular service, but it should complement rather than replace navigation, route planning, emergency supplies, and a shared trip itinerary.
Final Takeaway
A woman preparing for a national park visit alone should focus on three things: knowing the environment, being able to handle predictable problems, and staying willing to change the plan. Confidence grows from preparation, not from pretending nothing can go wrong.
For a first trip, choose something slightly easier than the maximum you think you can handle. Learn how you respond to navigation, solitude, weather, parking, trail decisions, and changing conditions.
Then build from there.
Solo national park travel can give you the rare pleasure of moving entirely at your own pace. Prepare carefully enough that the freedom remains the best part of the day.